Receiving an Email
- Organization of Emails
- Read Email Functions
- Toolbar and Menu Functions
- New
- Reply
- Forward
- Delete
- Retrieve Mail
- Actions
- Find
- Notepad
- Internet Explorer
- Navigator
- Email > Manage Folders
- Email > Empty Deleted Items
- Select Message > Right Click > Move to Folder
- The Download Email Dialog Box
- The Email Action Editor
- The Email Filter Genie
Description
Alpha Anywhere incorporates an Email Reader to complement the email client. The result is that you can use Alpha Anywhere for both your personal emails as well as your application-driven emails. To receive an email:
Select Tools > Email > Read Email... .
Optionally, click Actions to create, edit, or delete a ((|#The_Email_Action_Editor|action)) that pre-processes your incoming emails.
Optionally, click Find to display the ((|#The_Email_Filter_Genie|Email Filter Genie)) and search for emails. Click Find again to display all emails in your inbox.

Optionally, display the Profiles tab and select a different profile.
Click Retrieve Email.

In the resulting ((|#The_Download_Email_Dialog_Box|Download Email)) dialog box choose which emails to download.
Click OK.
Select an email from the list in the upper window to read it. The text appears in the lower window.
Optionally, click on any column header to sort messages in your inbox.
Click the 'left arrow' to reply to a message. Refer to Sending an Email.

Click the 'right arrow' to forward a message. Refer to Sending an Email.

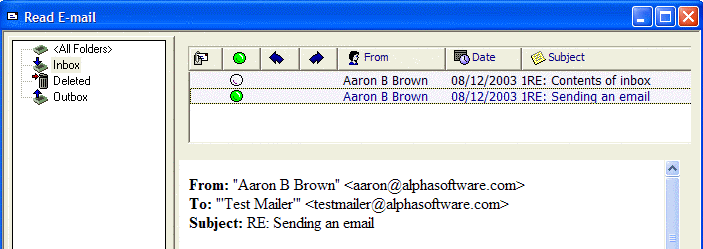
Organization of Emails
The Email Reader organizes emails both by folders and by profiles. The following image shows the Folder view. There are three default folders labelled "Inbox", "Deleted", and "Outbox". You can create any number of additional named folders. All views show seven columns of information for each email, from left to right:
whether there is an attachment to the email
whether the email has been read (white circle)
whether the email is a reply (left pointing arrow)
whether the email was forwarded (right pointing arrow)
the sender's name
the date and time of receipt (the Date column below was narrowed to hide the time)
the subject of the email
Clicking on the header of any column headers alternately sorts the visible emails is ascending or descending order.
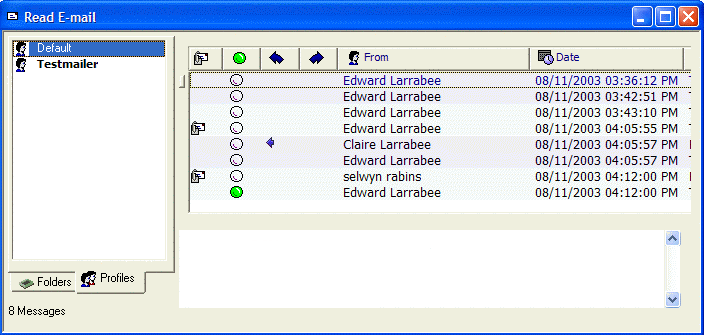
The Profile view shows all the emails for the selected profile.
Read Email Functions
Clicking on the column headers of the Email Reader sorts the display of messages in ascending and descending order.

Whether the message has an attachment.

Whether you marked the message as read.
Whether you replied to the message.
Whether you forwarded the message.

The sender of the email message.

The date of the email message.

The subject of the email message.
Toolbar and Menu Functions
The Email Reader supports the following functions.
New

Opens the Alpha Anywhere email client to compose a new email.
Reply
Opens the Alpha Anywhere email client to reply to a selected email.
Forward
Opens the Alpha Anywhere email client to forward a selected email.
Delete

Moves a selected email from any other folder to the Deleted folder. Permanently deletes an email from the Deleted folder.
Retrieve Mail
Displays the ((|#The_Download_Email_Dialog_Box|Download Email)) dialog box, which allows you to select which emails to retrieve.
Actions
Displays the ((|#The_Email_Action_Editor|Email Action Editor)) , which allows you to create, edit, delete, and prioritize actions.
Find
Displays the ((|#The_Email_Filter_Genie|Email Filter Genie)) , which allows you to create sophisticated queries that find emails. Clicking Find a second time displays the original un-filtered list of emails.
Notepad

Displays the HTML source of a selected email in Notepad.
Internet Explorer

Displays a selected email in Internet Explorer.
Navigator

Select the first, previous, next, and last emails in the current folder.
Email > Manage Folders
Displays the Manage Folders dialog box, which allows you to build and maintain a hierarchy of email storage folders.
Email > Empty Deleted Items
Permanently removes deleted emails from the Deleted folder.
Select Message > Right Click > Move to Folder
Displays the Move message dialog box, allowing you to move a selected message to an existing or a new folder.
The Download Email Dialog Box
The Download Email dialog box asks you to choose which emails to download.
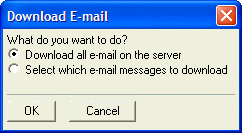
If you click "Select which email messages to download", the Download Email dialog box appears. This dialog box allows you to select, download, or delete individual messages from your email server. The Filter button allows you create an expression that will select emails.

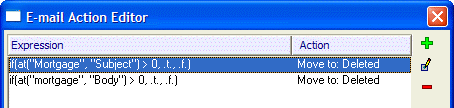
The Email Action Editor
The Email Action Editor provides an environment for creating, editing, deleting, and organizing actions to run again emails that arrive in your inbox. Actions can process any field in an email. Each action can move an email to a folder or to run a script.
Click the '+' icon to create a new action in the Add Email Action dialog box.
Click to edit an existing action.

Click the '-' icon to delete an action.
Click the following to organize the sequence of actions.


Click Run Now if you want to process your inbox.
Click OK to proceed or Cancel to discard your inputs.
Enter an expression in the Expression field. Click the 'xy' button to display the Expression Builder or the 'lamp' icon to display the ((|#The_Email_Filter_Genie|Email Filter Genie)).
Select an action. The choices are:
"Move to folder"
"Play script"
If you selected "Move to folder" in step 2, select a folder from the Folder list.
If you selected "Play script" in step 2, select a script from the Script list.
Click OK to proceed or Cancel to discard your inputs.
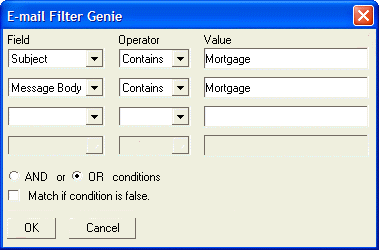
The Email Filter Genie
The Email Filter Genie provides a powerful search function that allows you to examine the values of multiple email fields and return a filtered list of emails that match your search criteria. To create an email filter:
Click Find in the Read Email dialog box.
Select an email field from the Field list.
Select an Operator. The choices are:
"Equals"
"Contains"
Enter a Value to test for.
Optionally, repeat steps 2 through 4 three more times.
Indicate whether all of these conditions must be TRUE (select the AND radio button) or only one condition must be TRUE (select the OR radio button).
Indicate whether you want the condition result of combining the conditions to be TRUE or FALSE.
Click OK to proceed or Cancel to discard your inputs.
See Also